Why Sweetie Needs a Sweater
On Friday, my pup visited her favorite groomer and went from being furry–fluffy to sheared. (Her fur mats very easily, so the groomer had to take drastic steps!) She was soon shivering, and I realized that her jacket wouldn’t be enough to keep her warm on our morning walks in temperatures below 50̊ F.
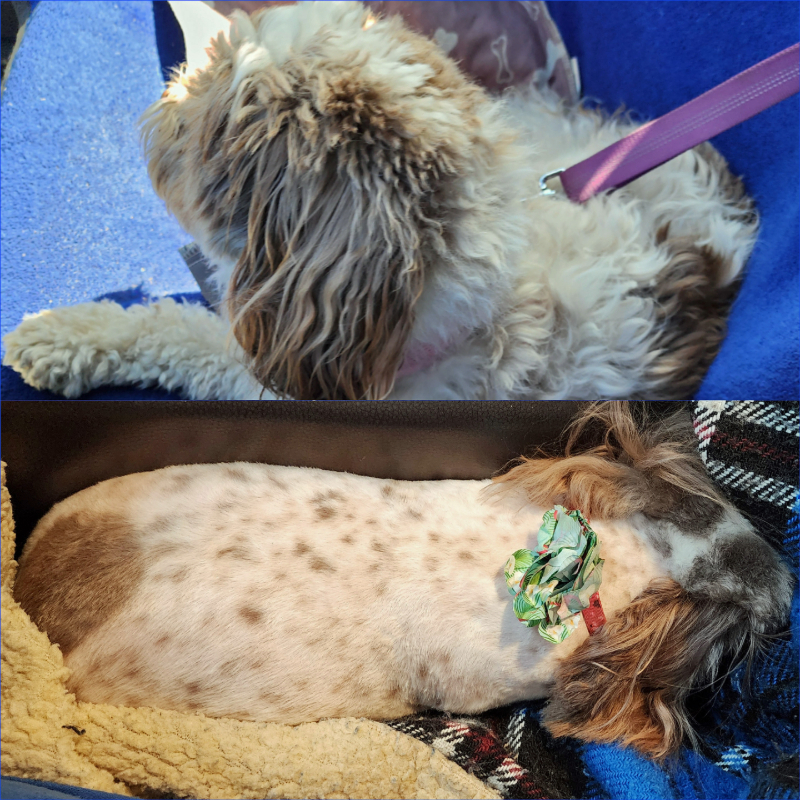
Figure 01. Sweetie, before and after her visit to the groomer — much less furry!
- Why Sweetie Needs a Sweater
- Why Knit?
- Supplies and Equipment
- Measuring
- Choosing a Yarn
- Winging It
- Choosing Needles
- Choosing a Basic Stitch Pattern
- Casting On
- Beginning
- Knitting the Fabric
- Increase the Width
- Checking Progress
- Continue Increasing Width
- Checking Width
- Shaping
- Stop Increasing
- Checking Length
- Counting Rows
- Creating a “Buttonhole” for the Leash Loop
- Decreasing for the Shoulder Area
- Adding a Neck Band
- Adding a Button and Loop
- Turning a Cloak into a Sweater
- Picking Up Stitches
- Knitting the Fabric
- Measure
- Make a Marker Row
- Continue Knitting to the Desired Length
- Trying on the Sweater
- Adding Buttonholes
- Continuing to Knit, then Binding Off
- Adding Buttons
- Details on My Yarn
She now needs a sweater to go beneath her jacket. BUT she absolutely hates having anything pulled over her head. She’s normally a very perky, happy gal, but when I approach her carrying her over-the-head harness, she literally cowers. I had bought her a sweater last winter, which she didn’t even wear one time because it required going not only over her head but also fitting her paws through holes. Clearly, something else was needed. I scrolled through countless listings of “dog sweaters.” None would work.
At first, I couldn’t figure out how I could knit her a sweater, either. What kind of sweater could I make without having to worry about getting her head and/or feet into holes in the sweater. Then I took a nap. Yay, naps! I woke up with a plan. I had no idea whether it would work, but it was worth a try.
Why Knit?
The best thing about knitting is that it’s forgiving! If you screw up, the worst thing that will happen is that you’ll have to unravel some (or a lot) of stitches or rows and start over. It won’t be irreparably broken (like glass, ceramics, or wood). Even if you cut your yarn prematurely, you can just knot it back together and continue. Easy-peasy. If you drop a stitch, which you don’t notice for a gazillion rows, it can be fixed — in many ways.
If you need help with figuring out how to fix something, please ask me about it in the comments. I’ll help you figure out what to do.
Yarn is much more expensive now than it was when I first learned to knit, but there are lots of ways to get used or cheap yarn. Thrift stores sometimes have yarn, and they often have knitted sweaters with beautiful fibers that just have a few flaws in them. I have unraveled some gorgeous alpaca blends and other fibers. (Check the seams. If the seams are cut, forget it. You won’t get enough usable yarn.)
I like to use natural fibers, which I buy at small local shops. However, if that’s not affordable for you, use what you can afford. Often natural cotton and wool are affordable if you’re not too picky about the colors.
For this project, here’s what you’ll need.
Supplies and Equipment
- Yarn (probably at least 100g or 3 ½ ounces; more if you’re using thick yarn) (Two eggs weigh a little more than 100g, 3.5–4 ounces.)
- Knitting needles (sized to suit your yarn), preferably circular needles
- 3 oversized buttons (knitted fabric stretches easily, so tiny buttons will soon slip out of buttonholes); I recommend using a shank button, which can be attached easily and can be manipulated easily, despite your pup’s squirming. Granted, these buttons will probably be hidden by a jacket, but why not go for some fun colors or fun patterns or shapes?
- Measuring tape
- Yarn needle and/or crochet hook
- Scissors (ideally little snippers, but even a ginormous pair will work)
- Optional:
- row marker if that helps you keep track of how many rows you’ve knitted
- rubber needle tips if you’re using straight knitting needles instead of circular needles
If you use straight needles, you need a rubber needle tip, to keep your knitting from falling off if you put it down briefly to answer a call or to get an emergency snack. If you use circular needles, you can just squoosh the fabric together and gently intertwine (or knot) the needles together.
Measuring
First, I loosely measured her back length (13″) and her belly circumference (18″) and her neck circumference (12″). I measured loosely because she’s shorn now, but once she fluffs out, her circumferences will be quite a bit bigger. Besides, who wants a tight sweater?

Figure 02. I measured Sweetie’s back length and her belly and neck circumferences.
If you’re measuring your own pet, probably the best place to check belly circumference is just behind your pet’s front legs. Either take pictures and make a separate cellphone photo album for them, or make notes to keep track of these measurements.
Then I measured her jacket length (9″ to the harness hole; 4″ from harness hole to neck) and width (belly and shoulders). That done, I had a general idea of the dimensions I’d need.
Note. If you’re going to include a “buttonhole” for a harness or other leash attachment, your total length for the cloak will be longer than the length to reach the buttonhole.
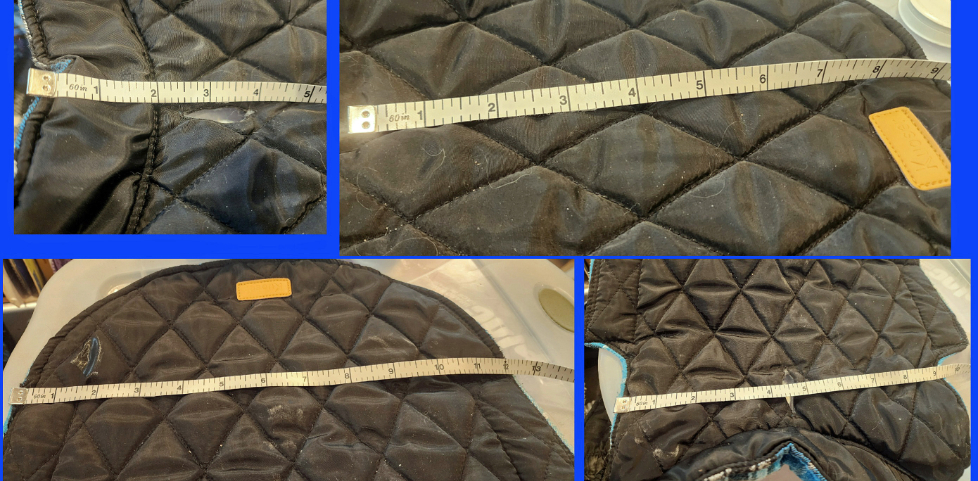
Figure 03. I measured Sweetie’s jacket length and its width at shoulders and at belly.
For your pet, if you’re never using a harness, you don’t need to worry about separating out the measurements to the buttonhole and from the buttonhole to the neck.
Choosing a Yarn
Next, I needed to think about what yarn to use. I needed it to be warm, so wool or a wool blend would be good. But I wanted it also to be sturdy and light, so some other fiber would be helpful. I looked through my yarn stash. (Yes, I have a yarn stash — all those impulsive buys at yarn stores!) I found 2 yarns that would work: a blend of wool and silk, and a blend of wool, silk, and nylon. For each of them, a single strand of yarn would be much too thin for a cozy sweater, so I decided to use both blends. Then I thought it needed a little something extra to make it softer, so I dug up a blend of cashmere, wool, and angora. I now had my three strands of yarn, which I’d use as if they were one strand.

Figure 04. Three strands of yarn: 1 strand of a wool–silk blend, 1 strand of a wool–silk–nylon blend, 1 strand of a cashmere–wool–angora blend).
When you’re choosing a yarn, think about the fiber you want (wool, alpaca, silk, cotton, linen, etc.). Wool (or another animal fiber) offers the most warmth, but it can be heavy, and not everyone likes handling pure wool. Silk is strong and insulates well, but it can be pricey unless you’re using a silk blend. Cotton and linen are great for summer wear, but they don’t insulate well in winter.
If you have specific questions about particular fibers, please feel free to ask me about it in the comments. If I don’t already know the answer, I’ll do research and find out.
You’ll also want to consider the weight of the yarn (meaning its thickness). A thicker yarn will knit up more quickly and will offer greater warmth, but it will cost you more for the same area of fabric. (50 grams of a thicker yarn will yield many fewer yards of yarn, which will give you many fewer square inches of fabric.) Also, a thick yarn might be just a bit too thick during mildly cool days.
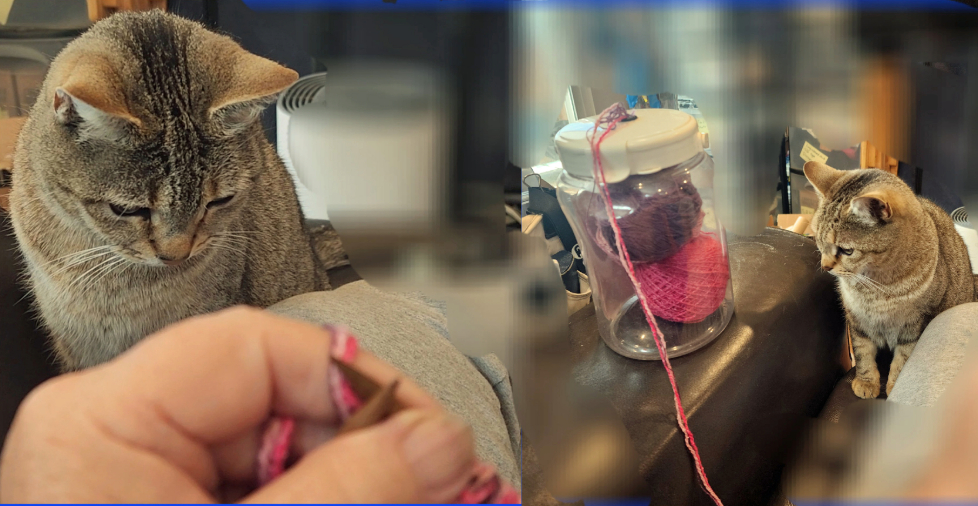
Figure 05. Buttercup is closely watching the jar and watching me knit, just in case I would like to invite her to play with the yarn.
One more big problem: My daughter’s cat, Buttercup, moved in with me almost 2 years ago, and she goes completely bonkers whenever I have loose strands of yarn. On the rare occasions I have gotten between her and loose yarn (intentionally or not), I have come away scratched. Clearly, I would not be able to use three separate balls of yarn, lying loose, to drive her absolutely nutso. Then I remembered that I had a snazzy jar for holding balls or skeins of yarn that aren’t center-pull balls. I had wound these three balls to be center-pull, but they’d still be of no use to me if Buttercup could see them rolling around. So I plopped all three into the jar, and because none of the balls were full, they all fit into the jar.
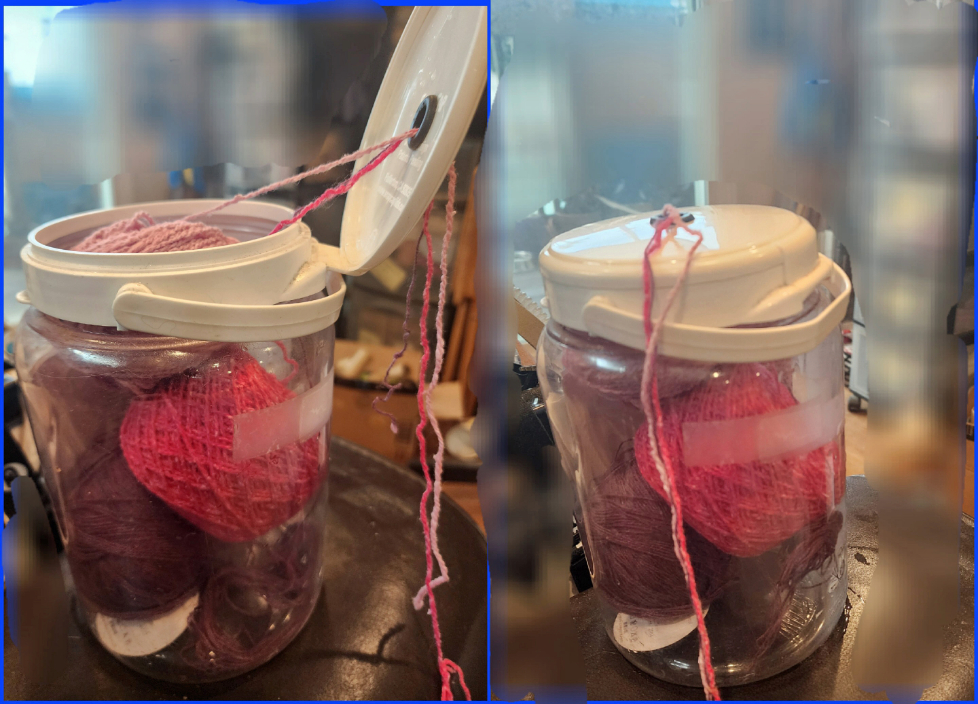
Figure 06. The Buttercup-resistant jar for holding three balls of yarn. If you don’t have a yarn-obsessed critter, you won’t need a jar.
Winging It
Because I’m designing this sweater as I go, I didn’t prepare a gauge swatch, which I almost always do. (A gauge swatch is a little sample of knitted fabric, usually about 4″ × 4″, on the knitting needles you plan to use, with the yarn you plan to use. It’s a great way to be sure that if you’re using a pattern, your fabric will turn out to be the right size using these needles for this yarn. If you’re going to spend a lot of time on a project, or you’re going to use some pricey yarn — isn’t it all pricey? — you do not want to finish 50 rows and realize you’re going to end up with a teensy or a ginormous knitted fabric!)
BUT! If you enjoy knitting, the absolutely very worst possible thing that can happen is that you’ll have to unravel all those rows and start again. Remember, you enjoy knitting, so unless you’re on a time clock (e.g., a birth day or a birthday rapidly approaching), even having to unravel your fabric and start again is NOT a huge problem. You do this for fun! (But I’m guessing you’ll knit a gauge swatch the next time.)
Choosing Knitting Needles
Even when winging it, I needed to figure out what size of knitting needles to use. The suggested needle size for one strand of the wool-silk yarn was U.S. 6 (4mm). I tend to knit more loosely than a standard knitter, and I wanted Sweetie’s sweater to be cozy, so I chose U.S. 8 (5mm) knitting needles for the three strands.

Figure 07. I chose U.S. size 8 (5mm) knitting needles, even for three strands of yarn, to keep the knitted fabric tighter. (I always use circular needles, even when knitting noncircular fabric. They hold lots of fabric easily, and there are times when you need the flexibility of working the fabric from the opposite end.)
When you’re choosing your knitting needles, look at the suggested size noted on the yarn tag. Do you tend to knit a bit more tightly than most other knitters? If so, maybe choose a slightly larger needle than the one suggested. If you tend to knit more loosely, consider choosing a slightly smaller needle than the suggested size.
Choosing a Basic Stitch Pattern
Next, I needed to choose a basic stitch pattern. I could have made a fancy complex pattern, to make it gorgeous, but it will almost always be hidden beneath her jacket, so that seemed like a waste. I also wanted the fabric to be tight but very stretchy. Some kind of ribbing would be best. A 1×1 rib (1 purl stitch, 1 knit stitch, alternating) seemed too tight, as did a 2×2 rib; a 4×1 rib would be too loose, so I settled on my Goldilocks pattern of a 3×3 rib (purl 3, knit 3, alternating).
Casting On
I hadn’t made a gauge swatch, so I started out by casting on just 18 stitches on the needle, using the “long-tail” method of casting on.
See https://en.wikipedia.org/wiki/Casting_on_(knitting) for an explanation of several methods for casting on, including the long-tail method. If you’re having trouble with doing this, please contact me through the comments, and I’ll find you a video, or I’ll make you one.
Beginning
Cast on 18.
I’m creating this as I go, so I easily could have chosen a different number, but 18 is a nice multiple of 6, for a K3/P3 pattern.
Optional: Alternate 3 stitches through back loop and 3 stitches through front loop, to start the K3/P3 pattern. NOT necessary!
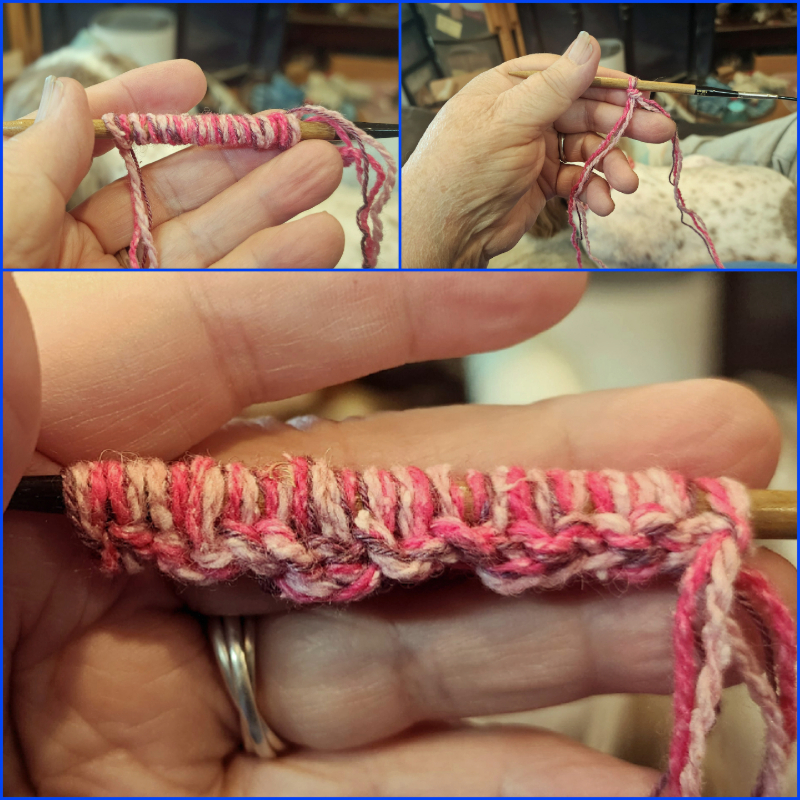
Figure 08. I cast on 18 stitches. First, I wrapped the yarn 18 × around the knitting needle, to be sure that my “tail” would be long enough for the 18 stitches. I used the “long-tail” method of casting on.
Knitting the Fabric
At last, all the prep is done, and it’s time to start knitting the fabric. Just to establish a base fabric, I knitted the first two rows in the pattern:
Row 1. (P3, K3) ×3; this means purl 3, knit 3, P3, K3, P3, K3; that is, (P3, K3) three times.
R2. (P3, K3), ×3.
Increase the Width
That done, it’s time to increase the width of the fabric. I knew I wanted a 13″ long fabric, so I could just gradually increase the width.
What I’m calling a “K1inc” is adding an extra knit stitch. I do that by creating a knit stitch (going through the back loop on the needle), but as I’m pulling the new stitch onto my right-hand needle, I leave the loop on the needle, then I go through that stitch a second time, to make whatever kind of stitch I should be making (a purl stitch on the start of Row 3).
What I’m calling a “P1inc” is adding an extra purl stitch. I do that by creating a purl stitch (going through the front loop on the needle), but as I’m pulling the new stitch onto my right-hand needle, I leave the loop on the needle, then I go through that stitch a second time, to make whatever kind of stitch I should be making (a knit stitch at the end of Row 3).
R3. K1inc, (P3, K3) ×3, P1inc. (You should have 20 stitches on your knitting needle after finishing this row.)

Figure 09. Even after just a few rows, you can see the increases starting to shape the width of the fabric.
Continue to add stitches at the beginning and end of each row. Notice that the pattern changes at the beginning and the end of each row, but it stays the same in the middle.
R4. K1inc, K1, (P3, K3) ×3, P1, P1inc.
R5. K1inc, K2, (P3, K3) ×3, P2, P1inc.
As you increase the width of the fabric, the repeating pattern is repeated more often (repeating 3× through Row 5, repeating 4× starting at Row 6).
R6. P1inc (K3, P3) ×4, K1inc. (26 stitches on your needle)
R7. P1inc, P1, (K3, P3) ×4, K1, K1inc.
R8. P1inc, P2, (K3, P3) ×4, K2, K1inc.
Another increase in the number of repetitions of the main pattern:
R9. K1inc, (P3, K3) ×5, P1inc.
R10. K1inc, K1, (P3, K3) ×5, P1, P1inc.
R11. K1inc, K2, (P3, K3) ×5, P2, P1inc.
Checking Progress
R12. P1inc (K3, P3) ×6, K1inc. (38 st)
(On my fabric, at row 12, the fabric was 12″ wide and 2 1/3″ long. You may want to measure your fabric at this point, just to see how it compares with the length and width you want.)

Figure 10. Occasionally, check the width of your fabric, to see how close you’re getting to the width you want.
Continue Increasing Width
You should occasionally stop and measure your fabric’s width. Following is how many rows it took me to reach the desired width, but it might take you more rows or fewer. As soon as you reach your desired width, whenever that is, stop increasing.
R13. P1inc, P1, (K3, P3) ×6, K1, K1inc. (40 st)
R14. P1inc, P2, (K3, P3) ×6, K2, K1inc.
R16. K1inc (P3, K3) ×7, P1inc.
R17. K1inc, K1 (P3, K3) ×7, P1, P1inc.
R18. K1inc, K2, (P3, K3) ×7, P2, P1inc.
R19. P1inc, (K3, P3) ×8, K1inc. (50 st)
R20. P1inc, P1, (K3, P3) ×8, K1, K1inc.
R21. P1inc, P2, (K3, P3) ×8, K2, K1inc.
R22. K1inc (P3, K3) ×9, P1inc.
R23. K1inc, K1 (P3, K3) ×9, P1, P1inc. (58 st)
Checking Width
Check your width again.
R24. K1inc, K2, (P3, K3) ×9, P2, P1inc. (60 st)
(On my fabric, this row was 13.5″ wide in P3/K3 rib, and almost 5″ long)
If you haven’t yet reached your desired width, keep increasing as you knit each row.
Shaping
Once you reach your desired width, stop increasing.
R25. (K3, P3) × 10 (60 st)
Note. If you’re going to include a “buttonhole” for a harness or other leash attachment, your total length for the cloak will be longer than the length to reach the buttonhole. The “length” measurement here is only the length to the buttonhole, not the entire length of the cloak.
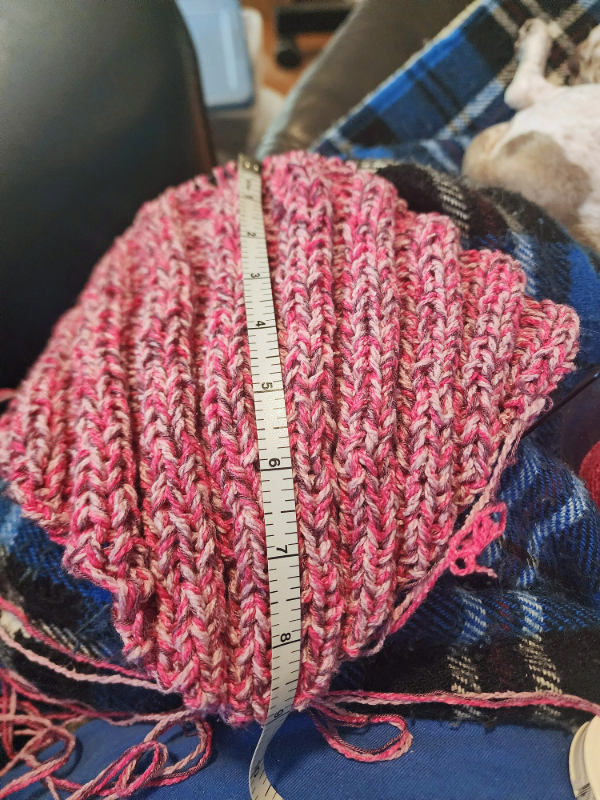
Figure 11. After you have reached your desired width, you’ll still need to keep checking the length of your fabric, to reach the desired length until you’re ready for your “buttonhole.”
Checking Length
You already have the desired width. Whew! From now on, you should occasionally stop and measure your fabric’s length until you reach the desired length (that is, the length from the tail edge of the jacket to the “buttonhole”).
Counting Rows
You don’t really need to keep a highly accurate count of rows on this project because the key to monitor is the length (and width). Nonetheless, if you want to keep track, either you can use a row counter (a gizmo showing a number, which you increase after knitting each row), or you can look at the middle column of stitches on your fabric. See the column of stitches rising from the bottom? If you poke your needle into the very bottom stitch, you can keep poking your way up the fabric to count how many rows you have knitted until you reach the row on your needle. (Use a needle, don’t just try to eyeball it, or you risk losing your place.)
For me, it took an additional 20 rows to reach the length I wanted: That is, I continued for an additional 19 rows to reach 9″ long (+20 rows; 25+20 = 45 rows). That number may differ for you. Focus on the length of your fabric, not the number of rows, to fit your pup.
Rows 26–45. Repeat Row 25: (K3, P3) ×10
Creating a Buttonhole for Attaching the Leash Loop
If you’ll never be using your sweater with a harness or other attachment for a leash, you can skip the next three rows. Also, I chose to make the “buttonhole” extra wide because I’m always fumbling to get the leash attached through her jacket (and sweater). You may be more adept than I am, so you may prefer a narrower “buttonhole” for your dog’s sweater.

Figure 12. When you’re ready for your leash-loop “buttonhole,” bind off the stitches for the size of hole you want. I use the “Decrease bind/cast off” technique mentioned in https://en.wikipedia.org/wiki/Binding_off but you may see a method that works better for you. To bind off in this way, I knit (or purl) two stitches together (depending on the stitch on the left-hand needle). Then, instead of moving that stitch to the right-hand needle, I slip it back onto the left-hand needle and knit the new stitch together with the next stitch. I continue in that way until I’ve bound off all the stitches I wish to bind.
R46. (K3, P3)×4, bind off 12 stitches, (K3, P3)×4.
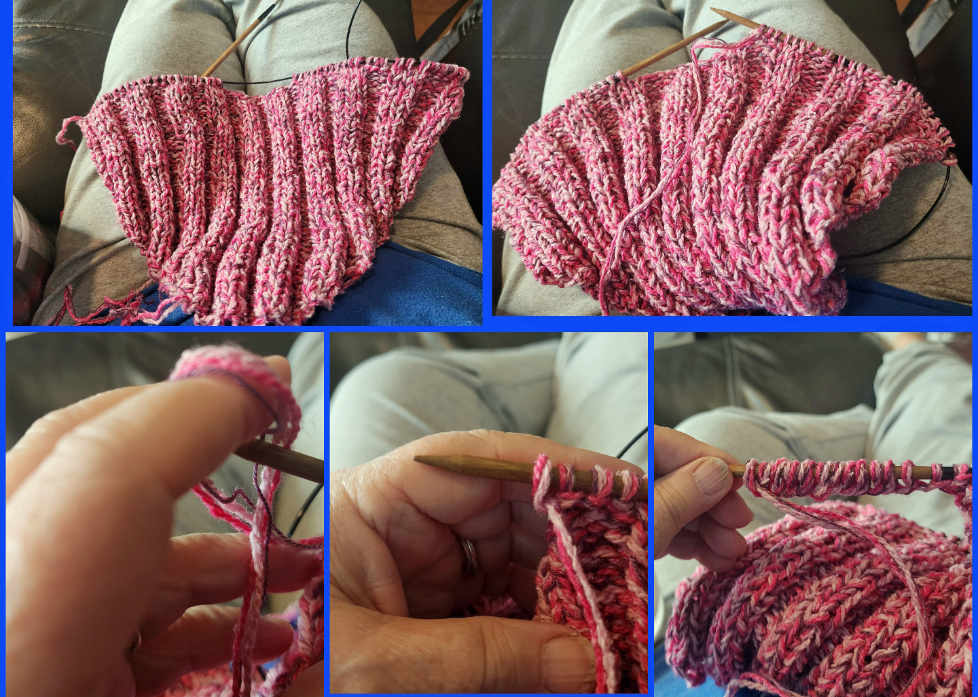
Figure 13. Once you have bound off a set of stitches for making a hole, on the next row, you must add back the same number of stitches. I use the cast-on backward technique. It can be tricky to get the tension just right, so it’s not so tight that you can’t insert a needle into the last few stitches, but it’s not so loose that the last few stitches have too much yarn. Fiddle around with this until you’re comfortable with the tension of these stitches.
R47. (K3, P3)×4, cast on (backward) 12 stitches, (K3, P3)×4.
(To read instructions on casting on backward, see “Single cast-on” at https://en.wikipedia.org/wiki/Casting_on_(knitting)#Methods_for_casting_on_in_handknitting)
R48. (K3, P3) ×10.
Decreasing for the Shoulder Area
Measure the width of your fabric at this point.
Start decreasing to reach the desired width at the shoulder area. You might notice that I suggest doing the decrease stitch (K2tog or P2tog) one stitch in from the edge. Doing so makes the edge smoother, and I think it’s a bit easier to do while keeping an even tension, row to row.
R49. K1, K2tog, (P3, K3) ×9, P2tog, P1. (58 st)
R50. K1, P2tog, P2, (K3, P3) ×8, K2, K2tog, P1. (56 st)
R51. P1, P2tog, P1, (K3, P3) ×8, K1, K2tog, K1.
R52. P1, P2tog, (K3, P3) ×8, K2tog, K1 (52 st)
R53. P1, K2tog, K2, (P3, K3) ×7, P2, P2tog, K1
R54. K1, K2tog, K1, (P3, K3) ×7, P1, P2tog, P1
R55. K1, K2tog, (P3, K3) ×7, P2tog, P1 (46 st)
R56. K1, P2tog, P2, (K3, P3) ×6, K2, K2tog, P1.
R57. P1, P2tog, P1, (K3, P3) ×6, K1, K2tog, K1.
R58. P1, P2tog, (K3, P3) ×6, K2tog, K1. (40 st)
R59. P1, K2tog, K2 (P3, K3) ×5, P2, P2tog, K1 (38 st, 9″ wide)
R60. K1, K2tog, K1, (P3, K3) ×5, P1, P2tog, P1

Figure 14. At this point, your cloak will be the right width for your dog’s neck, and you’ll be ready to add a neck band.
Adding a Neck Band
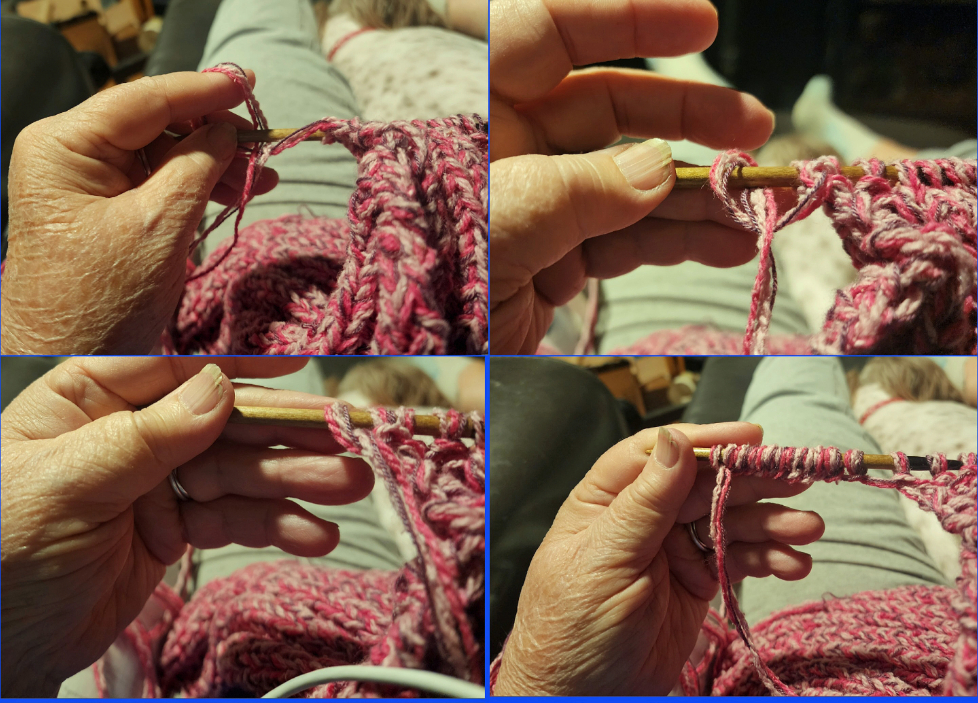
Figure 15. When you are within 1–2″ of your desired total length, you’re ready to lengthen each side of the cloak to create a neck band to wrap around your dog’s neck. Cast on 12 stitches from the edge of your knitted fabric.
Add 12 stitches, casting on backward, as you did previously for the big buttonhole.
R61. (K3, P3)×2 to get back to the existing fabric, (K3, P3)×6 across the row. Add 12 more stitches on the other side, casting on backward.
R62. (K3, P3)×2 to get back to the existing fabric, (K3, P3)×8.
R63. (K3, P3)×10 (60 st)
R64-70. Repeat R63 ×7.
R71. Bind off in pattern to the last 12 stitches. (K3, P3)×2
R72. (K3, P3)×2
R73. Bind off in pattern
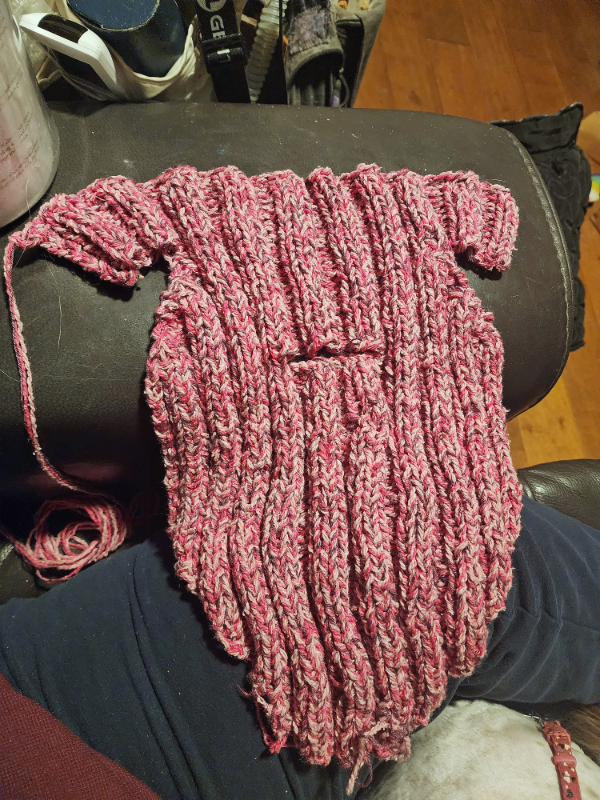
Figure 16. Once you have finished each side of the neck band, you’re ready to bind off and add the finishing details.
Adding a Button and Loop
Have your pup try on the cloak before you add the button and loop. Mark where the button should be placed, given that the loop will be at the opposite edge of the neck band. (Permanent marker is fine; the button will cover it up.)

Figure 17. Sweetie is less than enthusiastic about modeling her cloak, but at least I know it fits her, and I can put the button in the right spot.
Once you have marked the spot, sew a big button onto one side of the neck band, using needle and a double-strand of strong thread. You can’t overdo it on making the attachment strong. I recommend using a shank button, which is easy to attach and is easy to button up, even if your pup is squirming.

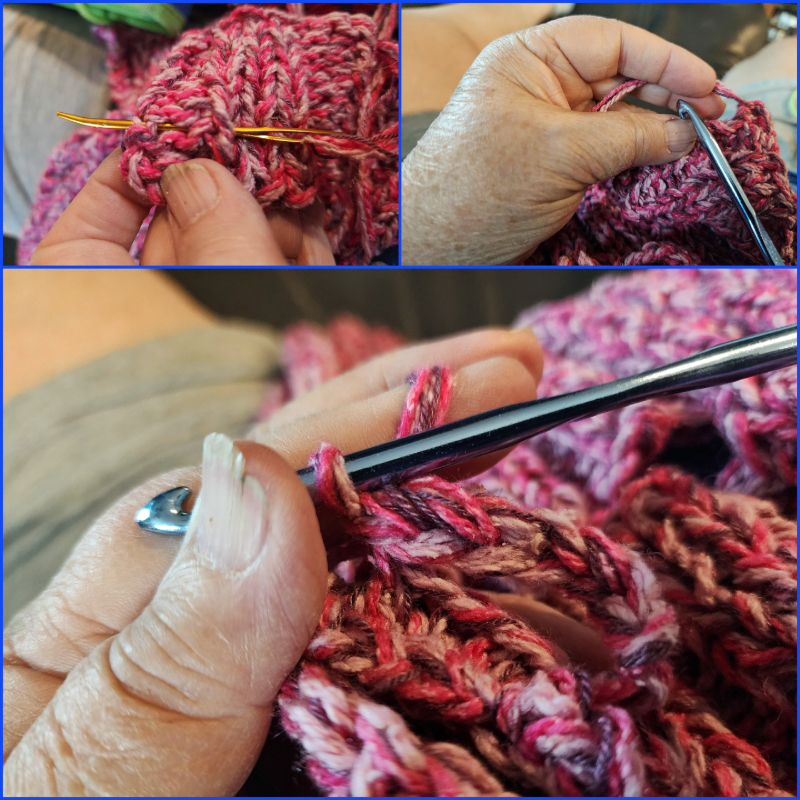
Figure 18-a, b. (a) Sew a big button to one side of the neck band, and (b) crochet a button loop for it on the other side of the neck band.
Crochet a loop on the other side.
At this point, you have completed a perfectly lovely, warm, cozy cloak for your dog. You may want to stop here. That was my original intention for Sweetie. She wore it Sunday morning, and it worked well.


Figure 19-a, b. (a) Here’s the cloak in action on Sweetie, in cold weather, and (b) the completed cloak.
But then I looked at my car thermometer; at 7:50, it showed 46̊ F. So I decided to add an extra knitted band to keep her belly warm, turning her cloak into a sweater.
Turning a Cloak into a Sweater
I now realize that I should have made the belly band wider. I should have picked up 20 — or even 24 — stitches instead of 16. However, because I actually used 16, here’s the pattern I actually used. If you have a male dog, this is probably the best plan anyway. If you have a female dog, however, you might want to make this belly band wider. I decided to make the belly band 13½” long (24″ from one side of the cloak to the opposite edge of the belly band). Again, once Sweetie fluffs out, she’ll be much wider. You’ll need to think about your pup’s belly circumference and add some overlap so you can attach the band to the other side of the cloak. Jot down the total length you’ll want for your belly band, extending beyond your dog’s cloak.
Picking Up Stitches
If you lay out your cloak, you’ll see that there’s an area where the fabric is completely straight, with no increases or decreases. Choose a side (any side) to which you’ll attach the belly band. Using your knitting needle, “pick up stitches” — that is, pull stitches through the side of the fabric, poking your needle through each knitted stitch just enough to grab some yarn and pull it through the stitch, then do the same for the next stitch and the next, until you have picked up 16 stitches (or more) from one side of the cloak.

Figure 20. By pulling yarn loops through the knitted stitches at the side of your cloak, you can make fabric going perpendicular to the side of the cloak. If you’re having trouble pulling the stitches through with your knitting needle, use either a yarn needle or a crochet hook to pull loops through, and transfer the loops onto your knitting needle.
Knitting the Fabric
Once you have all your stitches on your knitting needle, attached to the side of the cloak, you’re ready to start knitting.
R1. (P4, K4) ×2
If you want to, you can weave in the yarn ends while knitting this row:
R2. (P4, K4) ×2
Continue knitting in this pattern (e.g., for R3–R30).
Measure
From time to time, measure the length of your knitted fabric. When you reach the halfway point for your desired length, add a marker row, using the exact opposite pattern.
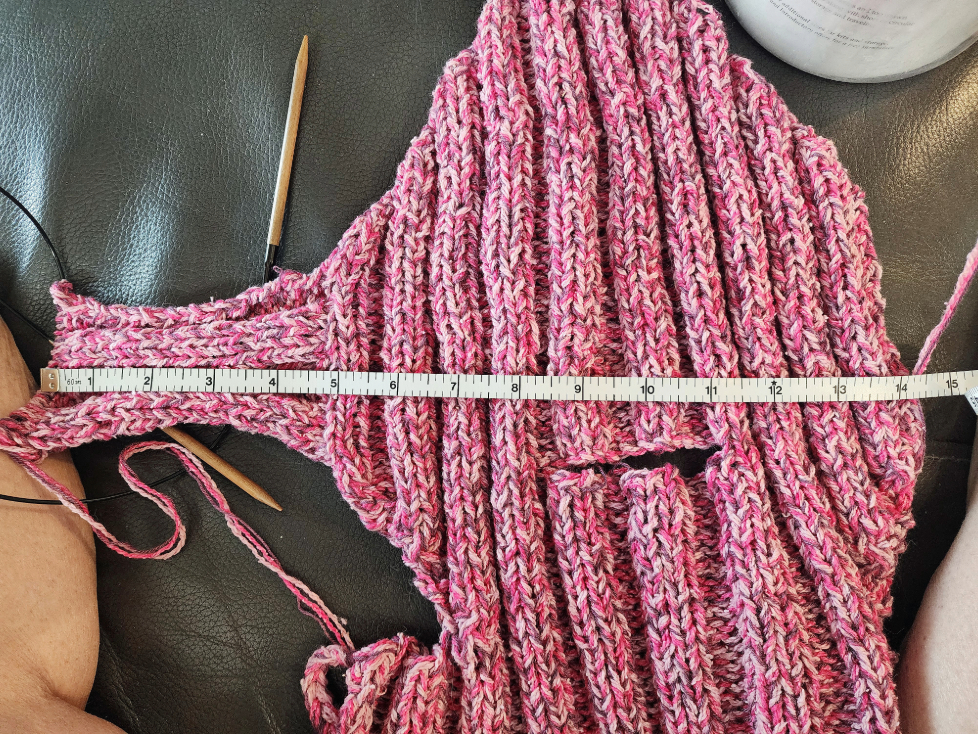
Figure 21. Measure the length of the belly band from time to time.
Make a Marker Row
For me, the halfway point was Row 30. So on Row 31, I knitted the opposite of the pattern: K4, P4 instead of P4, K4. (Don’t worry; it won’t show. It will be underneath your pup’s belly.)
R31. (K4, P4)×2
Continue Knitting to the Desired Length
Once you’ve created your marker row, you can go back to the usual pattern. If you knitted fewer rows than 30, you’ll want to stop sooner than I show here. If your halfway point comes after more rows, you’ll want to knit more rows than I show here.
R32–R63. (P4, K4) ×2 (×32 rows)
Trying on the Sweater
Have your dog try on the sweater!!! Make sure it fits your dog. If the belly band is too short, now is the time to easily add more. If it’s too long, you can either unravel the extra rows, or you can have it overlap more, to make it even more snuggly.
Adding Buttonholes
These buttonholes will make it easy to attach the belly band to the cloak, using buttons.
R64. P2, bind off 4, K2, P2, bind off 4, K2
R65. P2, cast on 4 backward, K2, P2, cast on 4 backward, K2.
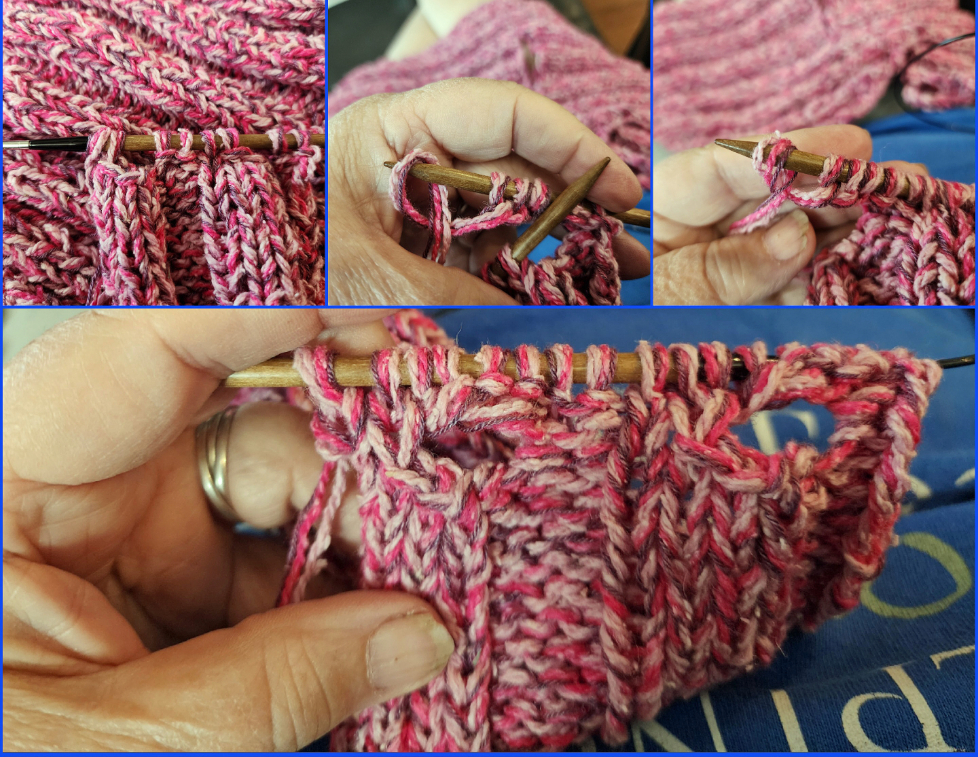
Figure 22. On the row where you want to add buttonholes, bind off the stitches for the width of the buttonholes you want, then on the next row of stitches, cast on the same number of new stitches, to create the buttonholes.
Continuing to Knit, then Binding Off
R66. (P4, K4) ×2
R67-69. Repeat R66.
R70. Bind off in pattern.
Weave in any stray strands of yarn.
Adding Buttons
Once more, consider having your dog try on the sweater, and mark where the buttons should be added. (It’s okay to use a permanent marker to mark the spot; it will be covered up by the buttons.)

Figure 23. Have your dog try on your sweater, and mark where you will want to sew on the buttons.
Using a double-strand of strong thread, attach both big buttons to the sweater, on the spots you marked.


Figure 24. My less-than-enthusiastic model, wearing her new sweater. She’s not saying so, but she’s delighted to have a sweater that will not have to go over her head and will not need me to mess with her feet to put it on. (Her jubilation is very subtle to detect!)
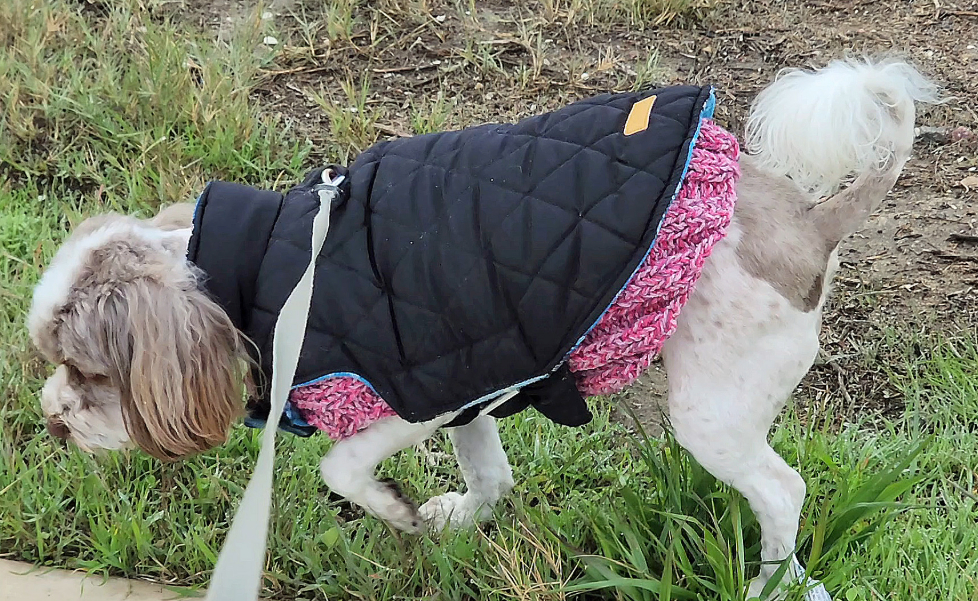
Figure 25. Sweater in action!
Details on My Yarns
Harrisville Designs, Silk and Wool Yarns
50% Wool, 50% Silk
50g 1.75 oz., about 175 yards/skein (1599 yards/pound)
4″×4″, 10 cm × 10 cm: 21 sts (rows not given) on US 3–5
Color 202, silk and wool Dusty Pink
Made in Harrisville, NH
Lot 001
Elsebeth Lavold, Silky Wool, designer’s choice
45% Wool, 35% Silk, 20% Nylon
50g 1.75 oz.
4″×4″, 10 cm × 10 cm: 30 rows, 22 sts on US 6, 4mm
Made in ltaly for KFI Roosevelt, NY
COLOR 26 (rose)
DYE LOT 1 0 8
SWAN LAKE
50%Cashmere, 40%fine wool, 10%angora.
365m/50g
US:1-3, 2.25-3.25mm
Col.11 Lot: 2004
http://www.lotusyarns.com
Copyright 2025, text and photos, Shari Dorantes Hatch. All rights reserved.

Leave a reply to Basic Knitting Techniques – Bird Brain Cancel reply