- Why Learn to Knit or to Improve Your Knitting?
- Beginnings: Getting Yarn onto the Knitting Needle
- Making a Slip Knot
- Casting On
- Long-tail Cast-on
- Backward-loop Cast-on, aka “Single Cast-on”
- Provisional Cast-on
- Tubular Cast-on
- Picking Up Stitches
- Two Basic Stitches: Knitting and Purling
- Endings: Binding Off
- Decrease Bind-off
- Three-Needle Bind-off
- Sewing to Bind Off
- Sewn Bind-off
- Tubular Bind-off
- More to Come
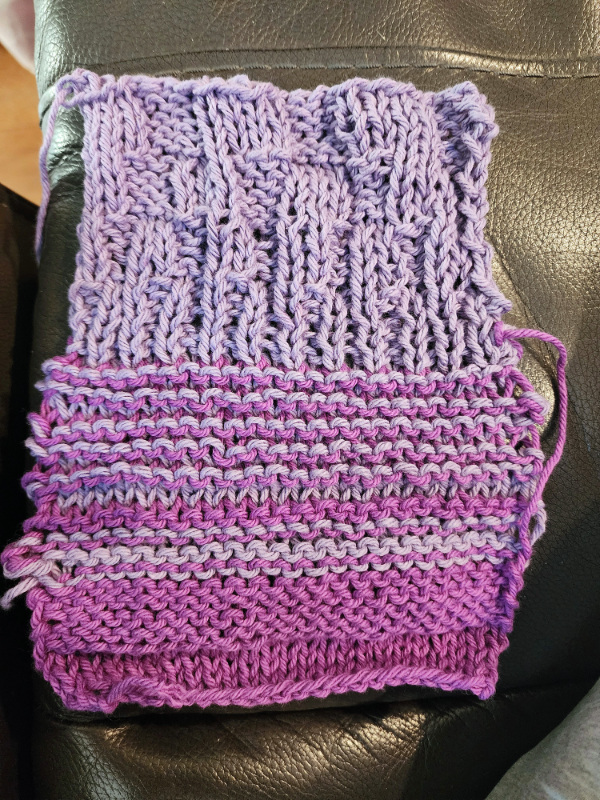
Knitting sampler — casting on, knit stitches, purl stitches, stockinette, reverse stockinette, garter, ribbing, binding off.
Why Learn to Knit
or to Improve Your Knitting?
For most knitted items, you can probably buy them more cheaply as finished products than if you buy the yarn and make the item yourself. So, for the vast majority of knitted items, you’re knitting it because you enjoy knitting. There are quite a few exceptions, of course: You can’t find what you want in your size, in the color(s) you want, in the fiber (wool, alpaca, silk, cotton, linen, etc.) you want, and so on.
Also, sometimes what you want doesn’t exist, as far as you can tell by looking for it. For instance, I needed a sweater for my pup, who had recently had all her fur shorn, but she absolutely hates having me put anything over her head, and she does not like me to lift her feet to put them into “armholes.” I could not find one single sweater that fit the needs of my pup, so I had to knit something that would work. You can see the result in my blog, https://bird-brain.org/2025/03/17/sweeties-knitted-cloak-or-sweater/

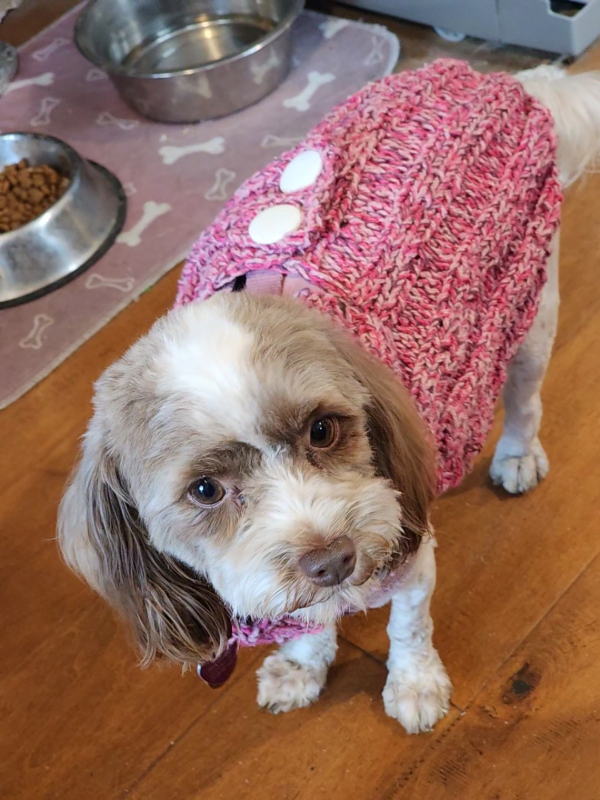
Figure 01a, 01b. (a) Myriad adorable dog sweaters go over your dog’s head and then over both of your dog’s feet. Sweetie wouldn’t tolerate that! (b) She isn’t delighted to model her sweater, but she does like keeping warm without having me fuss with her head or feet.
For most of us, the reason we knit, learn to knit, or want to improve our knitting is because we enjoy it. It’s kind of a be-here-now experience. It’s the process, not the product — though the product is pretty nice, too. Doing something you enjoy is its own reward, and a truly great thing about doing something you enjoy is that if you screw it up, no problem! You can simply unravel what you did (which yarn does so well!), and re-knit the part that didn’t work out.
Also, some apparent problems can be fixed pretty easily without having to completely start over. For instance, if you dropped a stitch (forgot to knit it somehow), there are lots of ways to fix it without having to unravel to where you dropped the stitch. (If you’d like some ideas for fixing a dropped stitch, please contact me through the comments, and I’ll try to help you.)
Another plus of knitting: It’s recyclable! If you have (or bought or found) a sweater or blanket that’s flawed (faded, hole-y, etc.), you can unravel the yarn and re-use it. If the color is awful, it can be dyed or combined with another yarn to make it more attractive. If it has holes, as you unravel it, you can knot together (or separate, then overlap) the sections of yarn.
Beginnings: Getting Yarn
onto the Knitting Needle
Before you can knit a single stitch, you need to somehow get some yarn onto a knitting needle, ready to start knitting. The first thing you’ll need to do is decide how many stitches you’ll want to cast onto your needle to start your knitting. Once you know how many stitches you’ll need, wrap your needle that number of times, spreading out the spiraled wraps. Also, don’t worry about how long the wraps look on your knitting needle. Wrapped yarn takes up much less room on your needle than knitted stitches do.
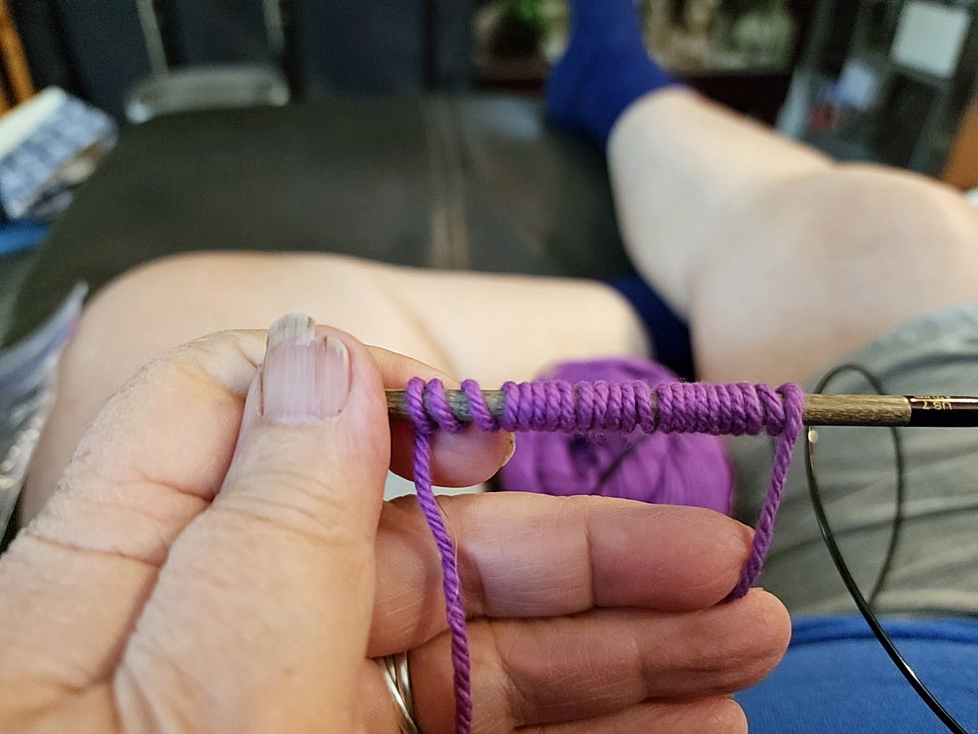
Figure 02. Wind the desired number of wraps around your knitting needle, to figure out how much yarn you’ll need for your “long tail” to cast on your first stitches onto your knitting needle. The yarn at the last wrap around your needle is where you’ll put your slip knot, which will be your first stitch.
By wrapping the yarn, you know how long a tail you’ll need for casting on your stitches. Grasp the yarn at the tip of your needle, and pull off the wraps. The place where you’re holding your working yarn is where you’ll be . . .
Making a Slip Knot
I found two videos that show you how to make a slip knot:
- This web page includes a how-to video https://www.wikihow.com/Make-a-Slip-Knot
- This web page shows the slip knot and three other beginning techniques: https://www.wikihow.com/Knitting-vs-Crochet
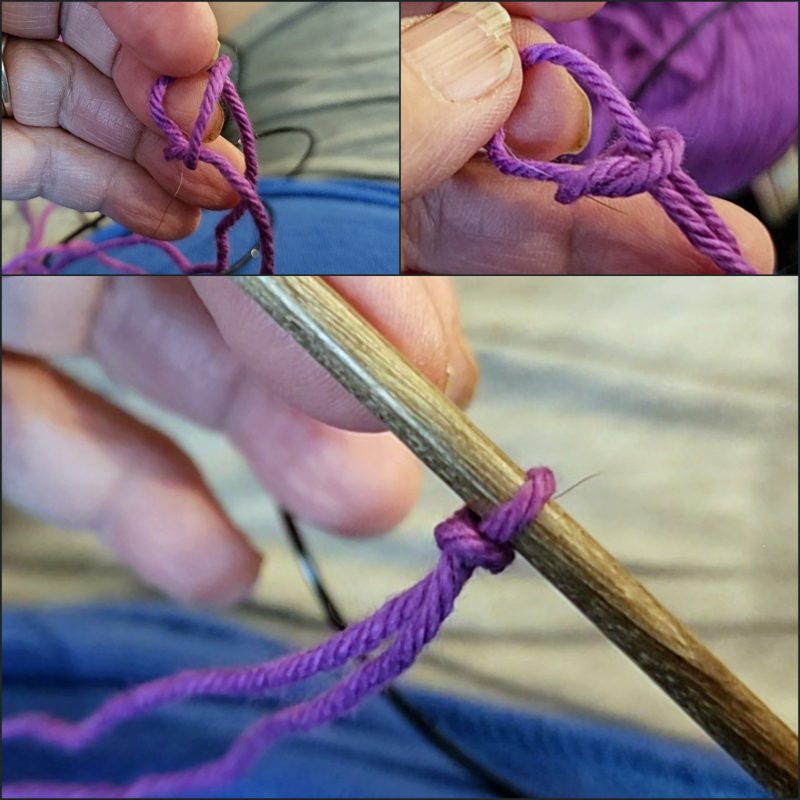
Figure 03. Once you know where your first stitch will be, create a slip knot. The slip knot counts as your first stitch of your knitted fabric.
Once you have a slip knot on your needle, you’re ready for . . .
Casting On
Casting on is the way knitters get yarn onto a knitting needle, to be ready to knit the first row. Knitters have devised numerous ways to cast on stitches. I almost always use one method, sometimes a second method, and—on rare occasions—two other methods.
- The main casting on method I use is the long-tail cast-on.
- On occasion, to add stitches to an existing fabric, I use the backward-loop cast-on.
- On rare occasions, I have used the provisional cast-on or,
- even less often, the tubular cast-on.
I discuss these four methods more fully later.
Tip. Most ways of casting on create a firm edge. Often, this edge can be a little more tight than the knitted fabric, so it pulls in slightly. To avoid this effect, use slightly larger needles to cast on your first stitches.
For descriptions of numerous other casting-on techniques, see https://en.wikipedia.org/wiki/Casting_on_(knitting)#Methods_for_casting_on_in_handknitting
Some of the methods described there are
- Knit-on cast-on, which is easy, but doesn’t make a neat, firm edge
- Cable cast-on
- Two-needle cast-on
- Braided cast-on
- Chain cast-on
- Crochet chain cast-on
- Provisional chain cast-on
- Turkish cast-on
- Magic cast-on
- Circular cast-on
- Old Norwegian cast-on
I don’t used any of the preceding techniques, but it’s good to know you have other options.
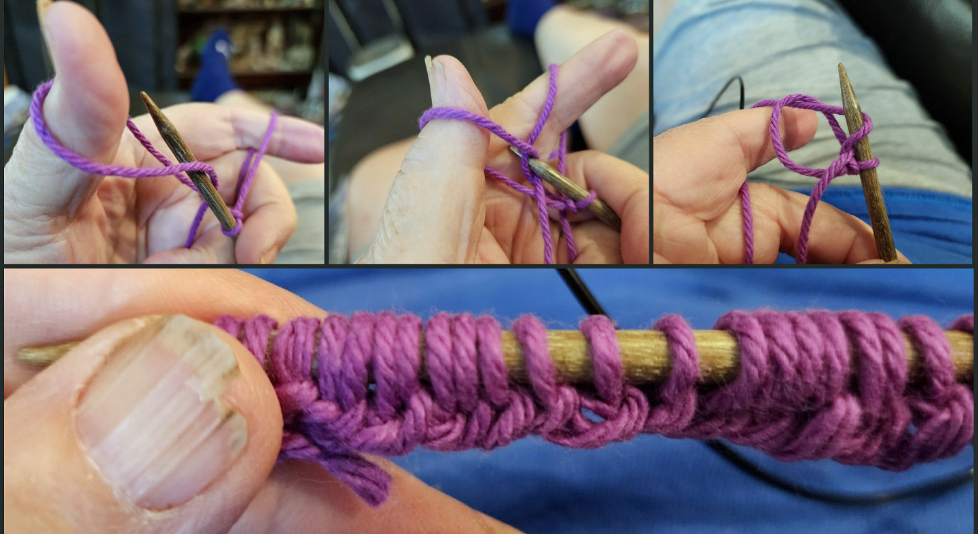
Figure 04. There are numerous ways to cast stitches onto your needle, some easier than others, some creating a nicer edge than others, and some that serve special purposes. For most knitted fabric, however, the “long-tail cast-on” method is fairly easy to master, and it creates an attractive edge to your fabric. If you’re not ready to tackle it, though, there are plenty of other ways to get started. Knitting should be fun, not frustrating.
Long-tail Cast-on
My main way to get stitches onto my knitting needle is the long-tail cast-on. I almost always use a slightly larger knitting needle to do so; if not, I take extra care to make sure that my cast-on stitches are extra loose, so they don’t create a tight edge that pulls in the fabric at the bottom. I think that this video does a good job of showing how to use this technique: Long Tail Cast On |
The long-tail cast-on technique is probably the best way to cast on stitches, most of the time.
Backward-loop Cast-on, aka “Single Cast-on”
When you need to add just 1–3 stitches to the middle of your fabric, you can use one of the methods for increasing stitches, which I will discuss in a later blog. However, sometimes, you may need to add 4, 8, 12, or more stitches to the middle of your knitted fabric. For instance, when you make horizontal buttonholes in your knitted fabric, you’ll need to bind off (discussed later) several stitches; on the next row of knitting, you’ll need to add back that same number of stitches.
The backward-loop cast-on is my go-to method for adding numerous stitches in the middle of a knitted fabric. This video shows how to do this cast-on technique: https://cocoknits.com/blogs/knit-tutorials/how-to-backward-loop-cast-on
(If you know how to make half-hitch knots, these stitches will be easy for you.)
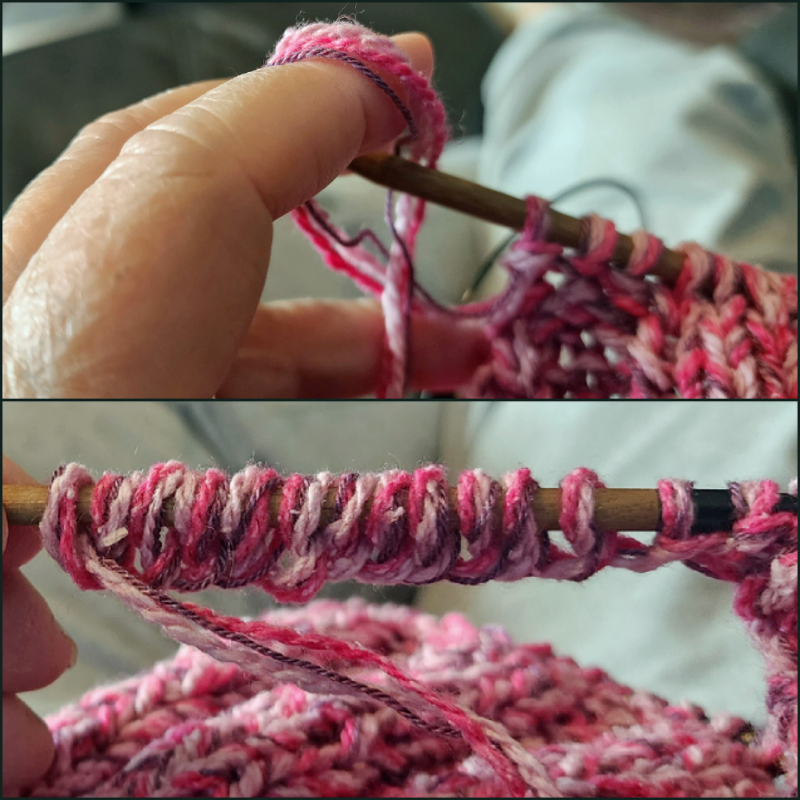
Figure 05. The “backward-loop cast-on” (which uses half-hitches, for you knotting fans) is most frequently used when you need to add stitches in the middle of a knitted fabric, such as when adding back stitches to make a horizontal buttonhole. Nonetheless, it can be used at any time, as long as you’re watching carefully how to get the stitch tension right — not too tight, not too loose.
The tricky bit about this technique is to create the right tension for the stitches. You don’t want it to be so tight that it’s hard to knit the last few stitches on the next row, and you don’t want it to be so loose that you have too much yarn for knitting the last few stitches on the next row. You probably won’t get the tension just right the very first time you do it. Luckily, knitting is forgiving. Try casting on this way, and feel how loose or tight the stitches seem on the needle. Then knit the next row.
If it’s easy to knit the next row, keep going. If it’s too hard to knit the last few added stitches on the next row, unravel the knitting (carefully transferring stitches!) to the point where you cast on the stitches. This time, cast on the stitches a bit more loosely.
If, instead, you have too much yarn on your needle on the next row, unravel to where you cast on, and this time, cast on the stitches slightly more tightly. Once you’ve practiced this technique a few times, you’ll have a sense for getting the tension right. And if you don’t, no problem; just unravel and do it again.
The long-tail cast-on and the backward-loop cast-on are the main techniques you’re likely to use or even to want to use. However, there may be occasions when you’ll want to try two other cast-on techniques: provisional cast-on and tubular cast-on.
Provisional Cast-on
A provisional cast-on creates a row of “live” knitting stitches at the beginning of your fabric. Normally, the stitches at the beginning of your fabric form a solid edge. Sometimes, however, you may want to have a row of “live” stitches at the beginning of your fabric, which can you pick up again later. By keeping the stitches live at the beginning, after you finish knitting to the other end of the fabric, you can turn it around and start in the opposite direction, to create a distinctive edge (ruffles, lace, etc.), a seam (the bottom of a pouch, etc.), a casing (e.g., for an elastic waistband), a contrasting color or pattern, or whatever else might strike your fancy. A provisional cast-on gives you more options if you’re designing on the fly. You can also decide not to do anything, and you can bind off those stitches and call it a day!
Here’s a video showing how to make a provisional cast-on: https://www.purlsoho.com/create/provisional-cast-on-video/?srsltid=AfmBOopw5n6_P49D0pGHCccu1pVrjA9sLSfxN7ZmRfYF3CkKc4Q9G-EZ
Tubular Cast-on
The only reason to learn this cast-on is if you want a casing (or hem or “tube”) at the beginning of your fabric (e.g., if you’re going to add a drawstring or some elastic at the start of your fabric). One way to create a casing (or hem or tube) is simply to fold down the fabric to the desired size and sew the edge of the fabric to a row of stitches farther up on the fabric. Nothing wrong with that!
However, a more elegant way to create a casing (e.g., for an elastic waistband) is to use a tubular cast-on. This post includes a video showing the “long-tail tubular cast-on”: https://ysolda.com/blogs/journal/tubular-cast-on?srsltid=AfmBOool_PqtusDtAqx5eHNUUEF4QCo_XolMJvSH2ZXE3Io69yT-NObI
In addition, you can find illustrated written instructions here: https://nimble-needles.com/stitches/how-to-knit-the-tubular-cast-on/
Picking Up Stitches
There’s also another way to get stitches onto your needle, which you can use when you already have a knitted fabric (or a very loosely woven fabric). Suppose, for instance, that you have decided that your short knitted top is just too short for you. It would be a shame not to be able to wear it, so instead, you could lengthen it by picking up stitches at the bottom edge of your top.
When you’re ready to pick up stitches, choose the edge of the existing fabric to which you’d like to add your extra rows of fabric. You can add knitted fabric in any direction, picking up stitches at any edge of your knitted fabric. By adding to a bottom or top edge, you can make the garment, blanket, or other fabric longer. If you are working from the bound-off edge, you don’t really need to pick up stitches; you can just unravel the bound-off row and transfer the unbound stitches to your needle. At the cast-on row, however, you’ll need to pick up stitches to begin the new knitted fabric.
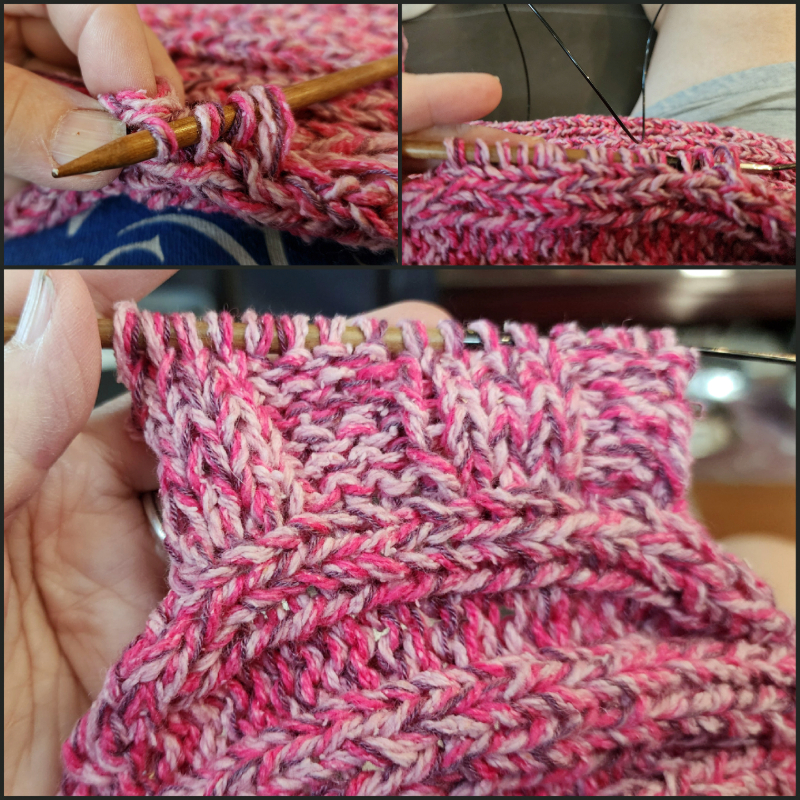
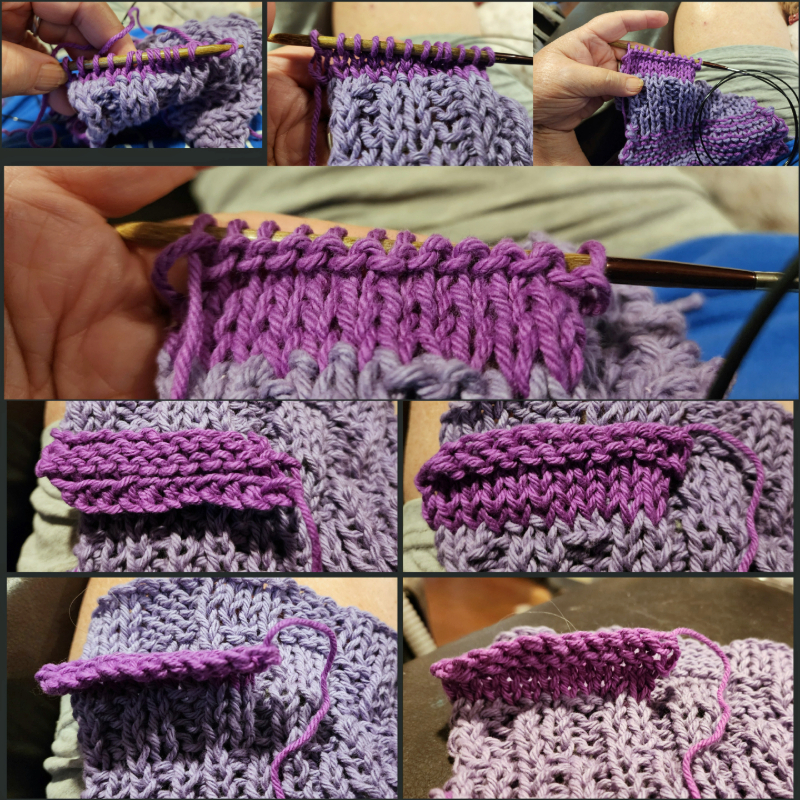
Figure 06a, 06b. You can pick up stitches at any edge of a knitted fabric. (a) Picking up stitches from the side edge of a fabric will turn your knitting perpendicular to the existing fabric. (b) If you want to go wild and wacky, you can even pick up stitches from the middle of a fabric, such as to add a flap, a ruffle, or a pocket in the middle of the fabric.
You can also make a fabric wider by adding to one or both side edges. Bear in mind, however, that if you start from a side edge, the knitting will be perpendicular to the existing fabric, going in a different direction. That can be a good thing! If you choose a complementary color or pattern, you can create an attractive “design feature” this way.
At either side edge, you can pick up stitches and start to knit perpendicular to the existing knitted fabric. Picking up stitches through the side can present a problem, though. If the side edge is more than a few inches long, you’ll need to check to see whether there are close to the same number of rows per inch going up the side as there are stitches per inch going across a row. If these differ quite a bit, you’ll need to make adjustments in how many stitches you pick up along the side, or the width of the new fabric won’t match the width of the existing fabric.
To check for a match, count 20 stitches (rows) going up the side, and measure exactly how long it is. Now count 20 stitches going across one row, and measure its length. If the measurement is about the same, you’re all set. If they differ widely, however, and that edge has lots of stitches/rows, you’ll have to make adjustments in how many stitches you pick up to make the fabric the right width. For instance, if 20 stitches (rows) going up the sides is 1″ but 20 stitches on a row is 2″, you’ll need to pick up half as many stitches along the side edge.
To pick up stitches, you’ll pull yarn loops through the existing stitches at the edge of the fabric, and you’ll put those loops onto your knitting needle. Usually, you can simply use your knitting needle, poking it through each knitted stitch just enough to grab some yarn, pull it through the stitch, and loop it onto your knitting needle. If you’re having trouble doing so using just your knitting needle, try using a yarn needle or a crochet hook to pull the yarn loops through the stitches. Keep pulling loops through the existing fabric until you have picked up the desired number of stitches from the fabric edge. For illustrated instructions, see https://www.moderndailyknitting.com/community/techniques-depth-pick-stitches/
Two Basic Stitches: Knitting and Purling
Knit Stitches
This is the fundamental stitch of knitting. You can create lots of knitted fabrics, such as scarves and blankets, if you know how to cast on, how to use the knit stitch, and how to bind off. True, you’ll be able to knit many many more things if you know how to purl and to do several other things (increasing, decreasing, etc.), but this one stitch is the basis of all knitting. Here are some illustrated instructions for the knit stitch, using the fast and easy continental style of knitting, https://nimble-needles.com/stitches/how-to-knit-the-knit-stitch/
I highly recommend using the continental style of knitting, but plenty of people have never knitted with this method and have created a vast number of beautiful knitted pieces without ever having tried it. In the United States, the most common method of knitting is the English “throwing” style of knitting. If you’re watching videos of knitting, most videos use this method. To see how it works, here are illustrated instructions with videos: https://nourishandnestle.com/knit-stitch/?gad_source=5&gclid=EAIaIQobChMIotyFtbOUjAMVISBECB06nBHTEAAYAyABEgJKUvD_BwE
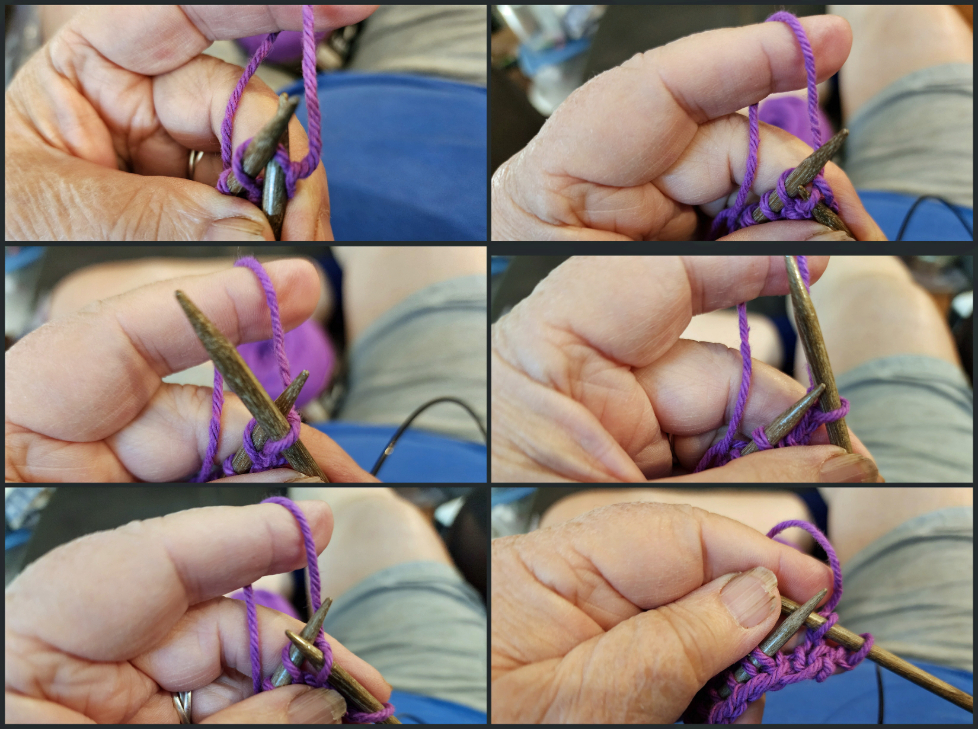
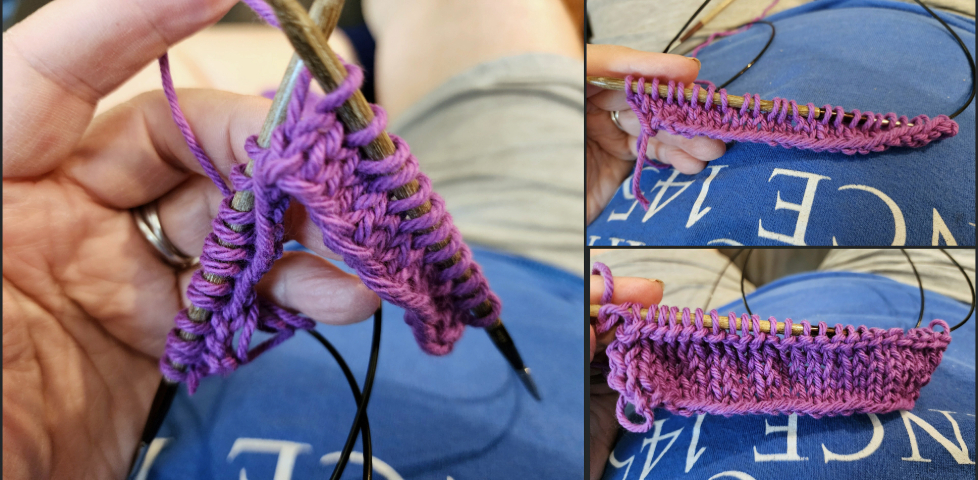
Figure 07a, 07b. (a) To make the knit stitch, you pull the yarn forward through the loop, so that the loop from the previous row is on the back of the stitch. (b) When looking at rows of knitting from the knit-stitch side, they look like a series of interlocking hearts or loops.
Purl Stitches
YIKES! I apologize in advance if you’re left-handed. I’m showing my right-handed bias when I refer to “left-hand needle” or “right-hand needle.” You’ll have to mentally make note of my error. BOTH of my granddaughters are left-handed (as was my mom); they know the pain of right-hand prejudice!
Both the knit stitch and the purl stitch are ways of getting a new loop of yarn through an existing stitch on the left-hand needle, and putting the new loop (and the existing stitch) onto the right-hand needle. The two key differences between making the knit stitch and making the purl stitch are
- Do you keep your working yarn in back of the needle while you work the stitch (for knit stitches), or do you keep your working yarn in front of the needle while you work the stitch (for purl stitches)?
- Do you point the needle through the loop from the back of the stitch to the front of the stitch (for knit stitches), or do you point the needle through the loop from the front of the stitch to the back (for purl stitches)?
Here are some illustrated instructions for purling, using the fast & easy continental style of knitting, https://nimble-needles.com/stitches/how-to-purl-stitch-for-beginners/
For the English (“throwing”) style of knitting, here are instructions for purling: https://sheepandstitch.com/library/how-to-purl-stitch-in-knitting-for-beginners/
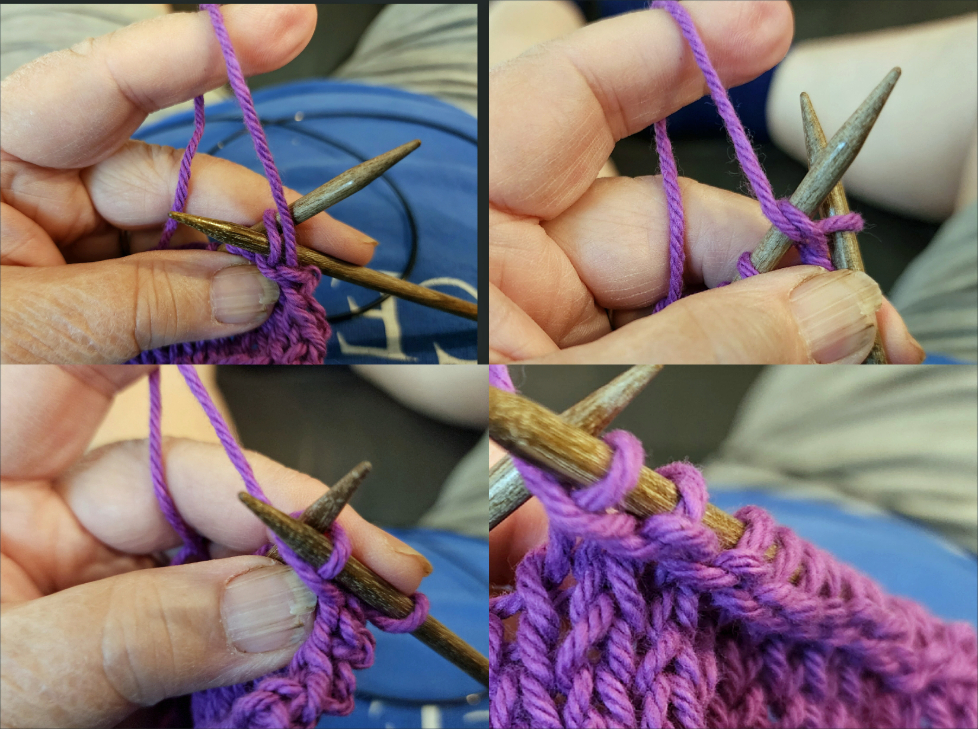
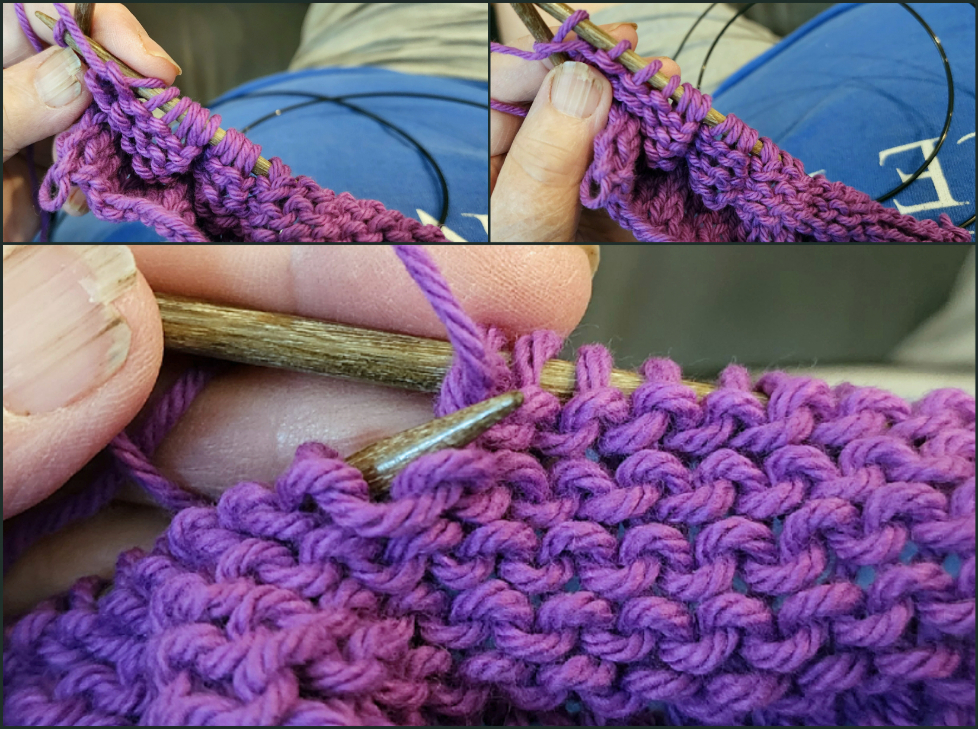
Figure 08a, 08b. (a) To make the purl stitch, you pull the yarn backward through the loop, so that the bump of the loop from the previous row is on the front of the stitch. (b) When looking at rows of knitting from the purl-stitch side, they look like a series of bumps.
If you look at your stitches, you can see that with the knit stitch, the loop of the current stitch is facing forward, and the bumpy loop from the previous stitch is on the back of the needle. With the purl stitch, you see the bump of the previous stitch’s loop facing forward, and the loop of the new stitch is on the back of the needle. After you knit an entire row of knit stitches, you’ll see a whole row of forward-facing loops. After you knit (yeah, it’s weird to say you’ll knit some purl stitches!) an entire row of purl stitches, you’ll see a whole row of bumps where the previous stitch is looped over the current row of stitches.
Endings: Binding Off
Decrease Bind-off
The method I use to bind off my stitches is called “decrease bind-off.” Basically, I work two stitches together as one. (Work means use either a knit stitch or a purl stitch; in situations where either one can be used, “work” can indicate either one.) Then I return the new stitch from the right-hand needle back to the left-hand needle. Next, I work the new stitch together with the next stitch on the left-hand needle. Again, I transfer the new stitch back to the left-hand needle. And so on. Eventually, I’m left with just one stitch and the working yarn on my left-hand needle. Then I cut the working yarn to a length I want (short if I’ll just be weaving it into the fabric, long if I’ll be doing something else with that yarn).

Figure 09. One way to bind off stitches to finish your fabric is to “decrease bind-off.” You work together the top two stitches on your left-hand needle. Then you transfer the new stitch you created back to your left-hand needle and work it and the next stitch together. You keep doing this until you’re at the very last stitch. Then you snip your working yarn and pull it through the last stitch. DONE!
By using the “decrease bind-off” method, I’m creating new stitches every step of the way, so I can adjust the tension to suit. Nonetheless, I usually use slightly larger needles to bind off my last stitches, to keep it from being too tightly worked. Otherwise, the bound-off edge can be a little tighter than the knitted fabric; the same thing can happen at the beginning cast-on edge, so I use slightly larger needles to cast on my stitches, too.
Just as there are many ways to cast stitches onto your needles, there are many ways to bind them off of your needles. You can see several of these methods at https://en.wikipedia.org/wiki/Binding_off
Of all the ways to cast off stitches, probably the simplest way is the “simple bind-off.” It’s a good idea to know how to cast off this way because occasionally, you may not have enough working yarn to knit an entire additional row — or even more than a few stitches. If this happens when you’re using a circular needle, you can just slide the stitches to the other end, with your working yarn at the far end. If you’re using straight needles, transfer all your stitches to your other needle, so that the working yarn is at the butt end of the knitting needle.
Once your working yarn is at the far end of your knitting needle, you transfer the first two stitches (formerly the last two stitches) to your right-hand needle, and you lift the first loop over the second loop, so you have one stitch on your right-hand needle. Move another stitch from your left-hand needle to your right-hand needle. As before, lift the first loop over the second loop. Continue in this way until you reach the last stitch (formerly the first stitch), with the working yarn attached. Snip the working yarn at a desired length (long enough to weave in or to do anything else you want it to do). Then pull the working yarn through the last stitch. This makes a very tight, inelastic edge, but it doesn’t use any more yarn. If you know in advance that you’ll be using this method of casting off, you can work your last knitted row using a larger knitting needle, so those stitches are larger and easier to manipulate.
If you still have plenty of working yarn, you can modify the “simple bind-off” by working (knitting or purling) two stitches, then once you have two new stitches on your right-hand needle, you slip the first stitch over the second stitch. Then you work the next stitch, and again, you slip the first stitch over the second stitch. Continue in this way until the last stitch, then pull the working yarn through the last stitch. This technique can be done using all knit stitches (called the “knit bind-off”), all purl stitches (called the “purl bind-off”) or any combination of stitches to keep in your fabric’s stitch pattern. If you use a slightly larger needle for the last row, it will be easier to bind off, and the edge won’t be too tight.
Here are some other options for binding off that you may want to know about: three-needle bind-off, sewn bind-off, tubular bind-off.
Three-Needle Bind-off
Occasionally, you may want to seam together two pieces of knitted fabric (e.g., the front and back of a sweater, or a raglan sleeve and a raglan shoulder). A neat way to join them, assuming that each one has the same number of stitches, is to use a “three-needle bind-off.” You’ll need both edges to contain “live” stitches. If you already bound off either or both edges, you’ll need to remove each edge’s binding, stitch by stitch, transferring each one to your knitting needle as you unbind the row.
Once you finish with both edges, you should have two full knitting needles, both with working yarn at the tip of the needle — and both with the same number of stitches. Orient both pieces so that for both, the right sides of the fabric (e.g., stockinette) are facing each other (on the inside of the knitting). (Some fabric doesn’t have a right or wrong side, e.g., ribbed fabric.) To have right sides together, you may need to add or subtract one row on one piece in order to make this work.
Note. You will actually have two strands of working yarn, one on each of the two needles. If you decide to use both strands, you’ll create a bulky seam, but that might be fine for you. You may, instead, decide to use just one strand of working yarn to bind off your seam. In that case, after you finish your seam, you’ll have to cut one strand at one end, weaving it toward the middle from one side, then cut the other strand, from the other end, weaving it toward the middle, too.
Once you have both of your full needles ready, you’ll need to have a third needle handy. If this knitting needle is slightly larger than your other two needles, so much the better. Hold the two needles in your left hand (assuming you’re right-handed), and with your third needle, work together the top stitch on each needle. If it’s a knit stitch, you’ll knit the top stitch on each of the two needles together, pulling the yarn through both stitches at the same time. If it’s a purl stitch, you’ll purl both stitches together.
Work the next stitch on each needle in the same work-two-together way. Once you have two new joined stitches on the right-hand (third) needle, lift the loop of the first stitch over the second stitch on that needle. Then continue in this way until you reach the last stitch, then pull your working yarn through the last stitch. For a video and illustrated written instructions on this technique, see https://www.purlsoho.com/create/3-needle-bind-off/?srsltid=AfmBOoq9_DhFmwEymIp-ngggwETP6eQf9FvXoK0B4JCkQD_OZ0uxZke4
Sewing to Bind Off
Two other methods for binding off involve using a yarn needle to sew/weave the stitches together. Both methods can be tricky, but they can create an elegant edge to your fabric. Because they are sewn in an intricate, time-consuming manner, undoing them can also require time and attention to detail.
Sewn Bind-off
This technique was designed to parallel the appearance of the edge using the long-tail cast-on for beginning a knitted fabric. For illustrated written instructions on this technique, see https://www.andrearangel.com/tutorial-blog/sewnbindoff
Tubular Bind-off
This technique was designed to parallel the appearance of the edge using the tubular cast-on to start a knitted fabric. Like the sewn bind-off, it uses a yarn needle to bind off the fabric edge. For illustrated written instructions on this technique, see https://shibuiknits.com/pages/tubular-bind-off For a video and written instructions on using the tubular bind-off on 1×1 ribbing, see https://www.knitpicks.com/learning-center/tubular-bind-off?srsltid=AfmBOoo4XMfTA8jENSYVF00n6X74_J44MjttidT7DhG_hkLHCeeNXNTj
More to Come
If you can cast on stitches, use knit stitches, use purl stitches, and bind off, you can knit a limitless variety of fabrics.
In a forthcoming blog, I’ll discuss some more information about knitting:
- Shaping: Increasing and Decreasing
- Knitted Fabric Types: Stockinette, Reverse Stockinette, Ribbing, Garter Stitch
- Using a Pattern
- Making a Gauge Swatch
Please feel free to suggest additional information you’d like about knitting — or anything else crafty, or birdy, or science-y! If you have particular questions about how to fix a knitting problem, please feel free to ask. I might just happen to have an answer. I look forward to hearing about your adventures with knitting — or any other crafty (or birdy) adventures.
Copyright © 2025, text and photos, Shari Dorantes Hatch. All rights reserved.


Leave a comment